
Most people have never bought a lift before, so the process feels like a black box. Here is exactly what happens from first survey to handover, written from the surveyor’s and fitter’s side of the job.
Home survey and needs assessment
A surveyor visits to measure up and watch how the lift will actually be used. They check ceiling height, floor-to-floor distance, joist direction in the room above, and whether the chosen spot sits clear of pipes, drains and the consumer unit. This visit, not the brochure, decides which lifts will physically fit.
Structural and electrical checks
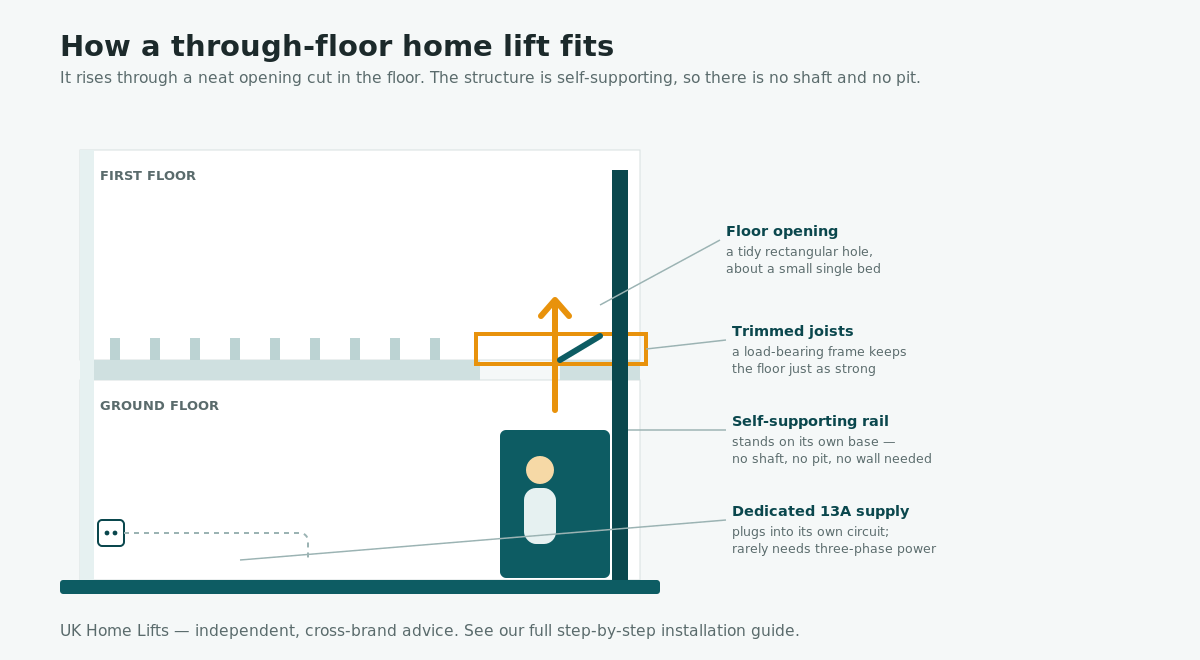
The surveyor confirms the upstairs floor can take the load and that the opening can be cut without removing a load-bearing joist. They also confirm the power supply. Most self-supporting through-floor lifts run from a standard 13-amp socket on their own circuit, so you rarely need a three-phase upgrade.
Order, finishes and a firm date
You sign off the model, the cabin or car finish, the gate side and the exact floor positions. The lift is then built to order, which is where the four-to-ten week lead time comes from. You get a fixed installation date rather than a vague window.
Protecting the home and marking out
The crew lays floor protection along the route, sets up a dust barrier around the work area, and marks the opening top and bottom using a plumb line so the two floors line up perfectly. Nothing is cut until both positions are agreed on site.
Cutting the floor opening
This is the only genuinely disruptive step. The team cuts the aperture in the upstairs floor and trims the joists, then forms a structural timber or steel frame around the hole to carry the load the cut joists used to. It is contained dust and noise for a few hours, not a building site.
Standing the lift and connecting power
The rail or drive column is fixed to the wall or stood on its own base, the car is assembled, and the lift is wired into its dedicated circuit. Because the structure is self-supporting, there is no lift shaft to build and no pit to dig under the ground floor.
Commissioning and safety testing
Before anyone rides it, the engineer runs the lift through its full safety sequence: door interlocks, the underside safety pan that stops the car if it meets an obstruction, the battery descent that lowers you gently in a power cut, and the overspeed and overload cut-outs. This is logged as the commissioning record.
Demonstration, paperwork and clean-up
You are shown how to operate the lift, use the call controls and trigger the manual lowering. You receive the handover pack, declaration of conformity, warranty and the first service date. The crew makes good around the opening and takes the waste away.
How long does a home lift take to install?
A self-supporting through-floor home lift is usually fitted in one to three working days. A straightforward two-stop lift between a ground floor and a single bedroom above is often a one-day job. Two days is typical once you add a larger opening, a wheelchair-sized car or trickier joist work, and three days tends to mean a heavier traction or shaft-based lift. The part that surprises people is the wait beforehand: because the lift is built to your chosen size and finish, expect four to ten weeks between placing the order and the fitters arriving.
The single biggest cause of a delayed install is not the lift, it is a clash under the floor. A soil pipe or a steel beam where the opening needs to go can force the lift a foot to one side, which then changes the upstairs landing position. A thorough first survey catches this on paper, not on fitting day.
What actually happens to your floor and ceiling?
A through-floor lift needs a rectangular opening cut between the two storeys, usually around the size of a small single bed. The installers cut the aperture, trim back the joists that cross it, and build a load-bearing frame, called trimming, so the floor stays just as strong around the new hole. When the lift is parked upstairs, a hinged or sliding floor section closes the gap so you keep a usable room and a level surface below. There is no shaft and no brickwork, which is why this type of lift suits ordinary houses and bungalows so well. If you are tight on room, our guide to the best home lifts for small spaces shows how small the footprint can be.
Do you need building regulations or planning permission?
Installing a home lift inside your own house is almost always covered by building regulations rather than planning permission, because you are altering the structure of the floor, not extending the building. Your installer handles the structural side and provides the paperwork that shows the opening was formed correctly. Planning permission is rarely needed for an internal lift, though it can apply to a listed building or a separate external structure. We cover the detail in do you need planning permission for a home lift.
What you should prepare before fitting day
You do not need to do much, but a few things make the day run smoothly:
- Clear the work area on both floors and move anything fragile out of the rooms directly above and below.
- Make sure there is parking near the door, since the lift arrives in large, heavy sections.
- Keep the route from the front door to the install spot clear for trolleys.
- Plan for pets and anyone sensitive to noise to be elsewhere during the cutting stage.
- Confirm where the dedicated socket will go so it is not hidden behind furniture later.
Will it make a mess?
Cutting the opening creates dust and noise for a few hours, which a good crew contains with sheeting and a dust extractor, so it stays in one room. There are no wet trades, meaning no plaster drying out and no screed, so you are not left waiting days for things to set. Most homeowners are back to a tidy house the same evening the lift is finished, with only the redecoration around the opening left to arrange if you want it.
How a home lift is tested before you use it
Commissioning is the stage that separates a fitted lift from a safe one. The engineer checks every protective system in turn and records the result. The safety features they prove out include:
- Battery descent — the lift lowers you slowly to the lower floor if the power fails.
- Underside safety pan — the car stops if it meets an object below it.
- Door and gate interlocks — the lift will not move unless everything is properly closed.
- Overload and overspeed cut-outs — the lift refuses to run if it is overloaded or descending too fast.
Your installer should give you a commissioning record and a declaration of conformity at handover. Keep these with your warranty, as they prove the lift was signed off correctly. To understand the standards behind them, see our guide to how safe home lifts are.
After installation: servicing and aftercare
A domestic lift is a serviced product, much like a boiler. Plan on one service a year to keep the warranty valid and the safety systems reliable, with your first visit booked at handover. Day-to-day running cost is low, since the motor only draws power during the few seconds it is moving. We break the numbers down in our home lift running costs guide and maintenance and servicing guide.
Can installation be funded?
Often, yes. Where a lift is assessed as necessary for a disabled person, it may qualify for a Disabled Facilities Grant of up to £30,000 in England, and supply and installation are usually zero-rated for VAT. Use our grants eligibility checker to see what help you could claim before you commit.
Questions to ask your installer
Before you sign anything, put these six questions to every installer you speak to. The answers make competing quotes easy to compare and flush out the costs that are easy to miss:
- How long will the installation take from start to finish?
- What building work is involved, and who carries it out?
- Is building control notification included in the price?
- What does the warranty cover, and for how long?
- What will annual servicing cost once the guarantee ends?
- Does the lift need a dedicated electrical supply on its own circuit?
Frequently asked questions
How long does it take to install a home lift?
Most self-supporting through-floor home lifts are installed in one to three working days. A simple two-stop lift is often done in a single day, while larger or wheelchair-accessible models take two to three.
Do you need to dig a pit for a home lift?
No. Domestic through-floor and self-supporting lifts do not need a pit or a separate shaft, which is what makes them suitable for existing homes and bungalows. Heavier commercial-style traction lifts can need a shallow pit, but these are rare in the home.
Does installing a home lift need building regulations approval?
Yes. Cutting and trimming the floor opening falls under building regulations, and your installer provides the structural paperwork. Planning permission is rarely required for an internal home lift.
Will I need an electrician?
Most home lifts run from a dedicated 13-amp supply on their own circuit. Your installer arranges the connection, so you do not usually need a three-phase upgrade or a separate electrician.
How disruptive is the installation?
The only noisy, dusty step is cutting the floor opening, which takes a few hours and is contained with sheeting. There are no wet trades, so there is nothing to dry out and the home is usable again the same day.
Ready to plan your installation? Estimate your cost, check grants, or request free quotes from vetted UK installers.
This guide describes a typical UK home lift installation and is for general information. Every property is different, and the exact process, timescale and structural work depend on a proper survey of your home. © UK Home Lifts. Free, independent home lift advice.